California Business Journal provides exceptional media exposure to small and medium-sized businesses, boosting their online presence.
Basement DIY Theater

Located in my basement, the theater is roughly 12.4' x 21' (8ft ceiling) with no windows. I wanted a space where I could control the light so my picture would have the best possible contrast and color accuracy. The back row riser is 7.5' x 6' and leaves a 32" isle by the entryway and 26" isles on the back and far side of the room. The first row of seats is set back 11.5' from the screen and the second row is around 17'.
A few highlights of the room’s design include the pine columns and soffit (with rope lighting) that surround the ceiling, four Murray Feiss lighting sconces and twelve eyeball lights.
We budgeted $7000 for all the electronic components and were amazed at what we could get for this relatively low cost. What really helped was some do-it-your-self tricks I learned in all my research such as using a white laminate countertop material for the video screen. I paid $59 for a single 5' x 12' sheet of Wilsonart laminate (Designer White D354-60) to make a 2.35:1 aspect ratio screen. I coupled it with Sanyo’s economical PLV-Z2000 1080p Projector and a Home Theater Brothers Anamorphic Lens.
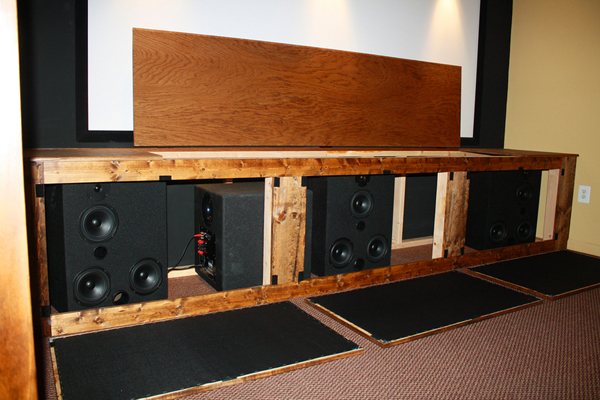
It took about an extra year, but there was a second phase where I hid the speakers, added wall panels by the entrance, installed a flatscreen TV to display movie posters, and incorporated a touch panel device to control everything.
Hiding the front speakers was important because I felt it would be less distracting and give the room a finished appearance. A hinged lid and acoustically transparent, removable panels was created so that the speakers and subwoofer could be accessed from the top and front of the stage.
Wall panels not only add a nice accent to the room but also help to eliminate audio reflection points. I followed good sound reproduction guidelines by using hard (or reflective) material on half the surfaces and textured (or non reflective) on the rest.
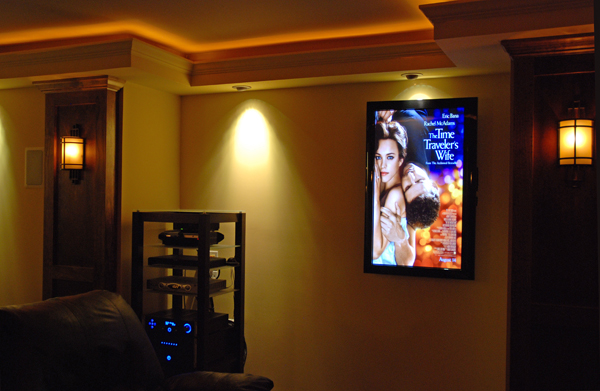
One of the most unique things in the theater is a dynamic piece of wall art, which is a vertically mounted 42” plasma TV (720p) that displays movie posters, There are 500 posters in rotation, which I got from www.impawards.com . To make it work, I used the TV as my monitor on an Apple Mac Mini computer and rotated the “desktop” image to 270 degrees. The free software running the slideshow is called Boxee and is available for Mac or PC. With this program I can control how the images are displayed. Now that I’ve used it for a while, I’m finding other content to display such as free-to-use images from around the web and various screensavers.
To control everything in the theater, I use an Apple iPad with the HSTouch app for controlling HomeSeer-compatible components. This was a natural choice because HomeSeer has been running the home automation in our house for years. The app allows me to program the interface to my liking and the iPad is a great solution because of its low cost and flexibility.

There is still more that I want to do with the theater and have a third (and final phase) planned for this year. I want to add wine velvet stage curtains, which will be controlled by the iPad app, Tuscan tapered round columns above the stage, and something (maybe a tapestry) to liven up the back wall of the theater.
Equipment List
130" CIH Screen (optimized for 2.35:1
Sanyo PLV-Z2000 1080p Projector with a Home Theater Brothers Anamorphic Lens
DVDO Edge Video Processor
7.1 Surround Sound via the Emotiva UMC-1 Preamplifier/Processor
Emotiva UPA-7 Amplifier
Elemental Designs Custom 6T6 Towers in the front & center
Emotiva ERD-1 rear surrounds
RC55i Polk Audio 5.25"s side surrounds
Playstation 3 for games and Blu-ray
HTPC Including XBMC Media Center Software with the Aeon Skin, 3.1Ghz Dual Core AMD 6100 w/ 4 Gigs Ram, MSI Geforce 8600 GTS 256 HDMI Video Card, HT Omega Striker 7.1 Sound Card
- Log in or register to post comments


