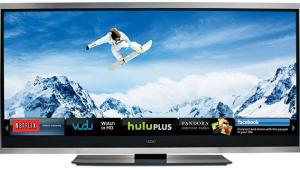
JVC LT-47X899 LCD HDTV
120 Hertz and All That Jazz
It hasn’t been that long since JVC left the rear-projection business. Its LCOS designs were among the best on the market—which is appropriate for a company that still makes LCOS front projectors.

But the rear-projection category is shrinking rapidly. More and more buyers opt to satisfy their dreams with a TV that they can hang on the wall—even if they don’t. Toward the end of its RPTV run, JVC launched a line of rear-projection designs thin enough, at around 10 inches, to be used that way. But the company never gave these designs a big push. Bowing to consumer demands, JVC has now put all of its one-piece HDTV resources into LCD flat panels.
The Procision X899 series is at the top of JVC’s newest lineup, with three models: 42, 47, and 52 inches. Our focus here is on the sibling in the middle, the 1080p LT-47X899.
Taking It All In
JVC packed the LT-47X899 with all the technological wrinkles it could assemble. Its image processors upsample today’s 8-bit sources to 12 bits (although the LCD panel itself is limited to 10 bits). It can also handle Deep Color (if and when we get Deep Color program material). It also does x.v.Color, although this format is currently limited to the few HD camcorders that can record it. In addition to the usual inputs (including three HDMI 1.3 and two component), the set also includes a USB Photo Viewer. You can use this to show your friends the JPEG photos you took last summer.
JVC provides five selectable Video Status modes in the Picture Adjust menu. (Video Status is JVC’s name for its preset, user-adjustable picture modes.) You can adjust the basic video controls separately for each Video Status mode, but not for all of the advanced adjustments. In turn, you can set each mode differently for SD (480i/p) and HD (720p, 1080i/p) sources. However, you can’t configure a given Video Status mode differently for each input.

Just below the Video Status selection is the Natural Cinema control. This is just a fancy name for a film/video control. The control has On, Off, and Auto options for film- (3:2 pulldown) and video-based sources.
Of the Video Status options, only Theater, Memory-1, and Memory-2 let you access the set’s advanced video adjustments. You won’t want to use all of these controls, but some are useful. For example, I set DSD Detail, H. Sharp (horizontal sharpness), and V. Sharp (vertical sharpness) to their minimum settings (–30). The backlight control, called Energy Save, worked best for me at –8, just a bit below its center position (0).

JVC provides two Color Temperature choices: High and Low. Low was the closest to correct, but it was noticeably better after I did a full calibration. To do this, I used the separate color-temperature adjustments in the User menu. The calibration adjustments are labeled High and Low for red, green, and blue. But it is not clear whether these are overall RGB adjustments for the Color Temperature options or if they are high and low RGB adjustments for fine-tuning the temperature at the top and bottom of the brightness range. My results suggest that they at least serve the latter purpose, since I used both the High and Low controls to perform an accurate calibration.
The LT-47X899’s Color Management system has controls for only four colors (red, green, yellow, and cyan). It helped a bit, but it didn’t significantly improve the shape of the inaccurate factory color gamut (see Measurements).
The LT-47X899 offers eight different aspect ratio options, although some are not available with all input resolutions. Full Native, which is the zero-overscan, 1:1 pixel map mode, is only available in 1080i and 1080p. Full mode, which is available in all formats, adds a bit of edge enhancement to the source. The enhancement isn’t defeatable, but it was subtle in 1080i and 1080p. However, this doesn’t matter because the enhancement-free Full Native aspect ratio is available for these resolutions. The enhance-ment was more evident with lower-resolution sources.
The Full Native option tends to switch to Full mode at the drop of a hat—or, more precisely, whenever you switch to a different source or turn off a source and then turn it on again. I got so paranoid about this that I started to check the aspect ratio setting every time I cued up a new 1080i or 1080p source. I just wanted to be sure the JVC was still in Full Native. Often, it was not.
With the exception of Pioneer plasmas, all of the flat-panel sets we’ve seen that accept a 1080p/24 source first convert the 1080p/24 input to 1080p/60 (by adding 3:2 pulldown) before displaying it. This JVC is no exception. It can’t take advantage of the judder-free benefits of 1080p/24 source material.
The set’s multi-component remote (which can control four devices plus the TV) is a good one. It includes backlit buttons and direct input selection. But while most of the buttons are large and well spaced, I had problems with the two rings of controls that surround the centrally located OK button. They are so closely spaced that I often hit the wrong button. I can’t count the number of times I pushed the Menu button instead of the left navigation button, which dropped me out of the menu I was using.
The set’s audio is decent for non-critical listening. Most importantly, vocal reproduction is free of annoying coloration at reasonable playback levels. For a serious home theater experience, though, you’ll want to route the audio from the onboard ATSC and NTSC tuners to an outboard system. The set has both TosLink digital and L/R stereo analog outputs for that purpose.
Love Hertz
Like many new LCD designs, the JVC drives its panel at 120 hertz. It converts 1080p/60-fps (frames per second, or Hz) sources to 120 Hz by adding an additional frame to each real frame. The set converts lower-resolution inputs (and 1080p/24 material in this set, as discussed above) to 1080p/60 and processes them in the same way.
The 120-Hz frame rate helps reduce motion lag, a still-nagging problem with LCD technology. But displays can now interpolate those extra frames from the original frames that precede and follow them, rather than simply repeat each frame twice. This technique reduces motion lag to the point where it nearly disappears. As a result, manufacturers are making a headlong rush to include 120 Hz as a must-have feature.
The only problem is that frame interpolation often smooths out the motion in a way that makes film-based programming look like it was shot on video. Most such sets offer a way to turn this feature off, with options such as On (with interpolated frames) and Off (with repeated frames). If you choose the repeated frames, you won’t see much improvement in motion lag, but it will maintain the look of film. (You can’t turn the 120-Hz panel frame rate back to 60 Hz because the higher rate is inherent in the design of a 120-Hz set.)
- Log in or register to post comments
