Do I have to remove the soundbar? Only want surround for cd player and vcr.
Money for Nothing and Your Tweaks for Free Page 3
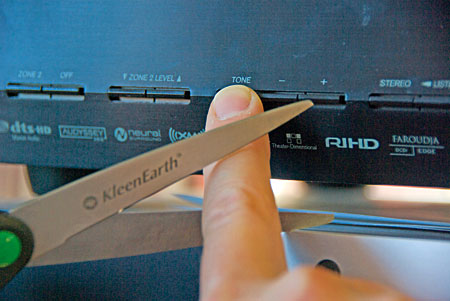
Nothing screams, “Smack me upside the head with a two-by-four!” like bass and treble controls turned all the way up. If your speakers are so bad they need that kind of tonal compensation, no tweaks printed here will help your system. Tom suggests that you center all of your receiver’s tone controls and listen that way for at least a week—even if you don’t like it at first. Over-hyped equalization can sound enticing at first, but once you get used to a more natural balance, you’ll hear through the disguise. If you still find that the sound lacks in the highs or the bass, experiment with small boosts or cuts. Fully cranked tone controls are almost never a good idea. (And there’s always the risk of running into one of those two-by-four-wielding audiophiles.)
Cost: Free
4. Set Phase to Stun
If you find that turning the bass control all the way up doesn’t do much to increase the bass in the room, there’s a good chance your speakers are wired out of phase. This essentially means that your left speaker is working overtime to cancel the bass response that the right speaker is producing. It could also mean that your subwoofer is sabotaging your main speakers. Although being out of phase by itself won’t damage speakers and subwoofer, it will harm the reputation of even the best speakers and subs. Plus, it could cause damage to the tweeters if you perpetually crank up the volume and bass control. If you have one of the video test discs mentioned above, check to see if it includes a system phase test. If not, here’s an easy way to hear if your main speakers are in phase:
SETTING THE PHASE
If you’re between the speakers and hear more low-frequency content with the balance control to one side rather than in the center position, either your speakers are out of phase or you need your hearing checked. With the system powered down, look for swapped positive and negative wires on the back of the AVR and each speaker. Don’t think you could never hook up your speakers out of phase, because that’s exactly when it will happen.
After you’ve verified (and fixed, if necessary) the phasing of your main speakers, it’s time to find out if your subwoofer is in phase with your mains.
SETTING THE SUBWOOFER
If there’s a smooth transition between the main speakers and sub, voilà, you’re done. If there’s a missing or overemphasized range between the main speakers and sub, adjust the phase control on your sub for the best blend possible. If your subwoofer doesn’t have a phase control, you can either move the subwoofer to another spot in the room (see “Crawling for Bass”) or reverse the connections on all of the rest of the speakers in your system to match the subwoofer.
Cost: Free
5. Acoustibration
A lot of AVRs, and increasingly some HTIBs, include built-in automated calibration. If your AVR has the capability, the process is brainlessly simple:
USING AUTOMATED CALIBRATION
Most automated calibration routines take less than 15 minutes (not counting the time it takes to find the microphone). While the results might still benefit from a bit of manual tweaking, it’s a relatively painless way to make sure all the speakers are in phase and have been set with acceptable levels and time delays.
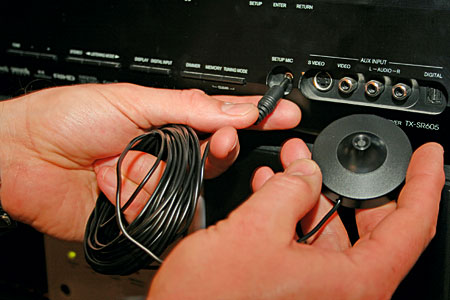
Even without built-in calibration, most AVRs have internal test tones you can use to set the speaker levels manually. The ultra-cheap calibration method is to use your ears to set the levels as you toggle the test tones through each speaker. (Some audiophiles actually prefer to set the levels this way.)
The relatively cheap method requires a sound-level meter. An analog sound-level meter from RadioShack costs $45. (A digital version is available for $5 more, but resist the temptation. Most users find that the analog meter is more intuitive, and it’s easier to achieve useful results.) I’ve seen other meters for less than $30. If you don’t want to spring for a meter, tell a friend who hasn’t read this article that he really needs to own a sound-level meter in order to properly set up his system. After he’s bought one, ask if you can borrow it.
Once you’ve acquired your meter, here are a few guidelines to follow:
SETTING THE LEVELS MANUALLY
If you don’t like to use the automated rou-tine, don’t worry. There are some calibration discs—including the video calibration discs I mentioned earlier and any theatrical release on a THX-mastered DVD—that include audio tones for setting the output levels.
Anytime you make significant changes to your room (get new furniture, change the layout of the furniture, move the speakers, etc.), you should recalibrate your system. Painting the room doesn’t qualify, but adding or removing picture frames and curtains does.
Cost: Free to $50
6. Learn Anglish
Although there’s no international law that covers it, a number of professional organizations (ITU, AES, NARAS) and companies (Dolby, THX, and others) do have recommendations about the placement of speakers in your home theater. While they don’t agree on every detail, it essentially comes down to this.
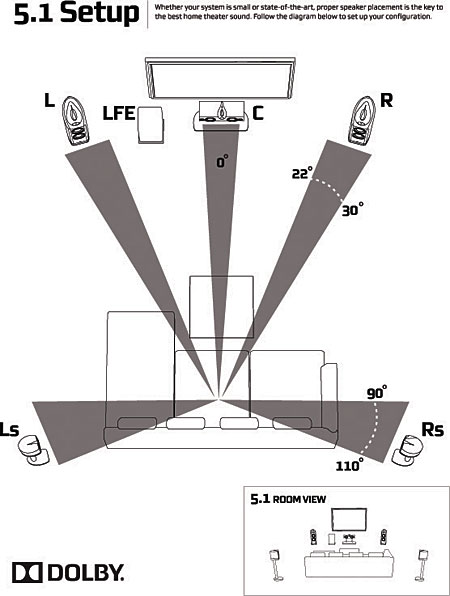

Even though your room is most likely rec-tangular, think of the ideal speaker placement in terms of a large circle with you, the listener, in the center and your TV on the circle direct-ly in front of you. Now get out your protractor.
PLACING YOUR SPEAKERS
This arrangement puts the speakers basically in the same locations that sound engineers use when they remix the soundtracks for DVD or Blu-ray Disc releases.
Cost: Grade-school geometry lesson
- Log in or register to post comments


In the ever-evolving landscape of cryptocurrencies, I stumbled upon a website that simplifies the process of trading digital assets. This platform buy crypto using credit card offers a sophisticated interface that ensures a secure and efficient experience for both buyers and sellers. Regardless of your level of expertise, this website provides an invaluable resource for those interested in participating in the dynamic crypto market.

"Money for Nothing and Your Tweaks for Free" on page 3 is a revelation for me. Uncertain about investment avenues, this article addresses my concerns. Additionally, the link explaining how to turn Bitcoin into USD https://icoholder.com/blog/how-to-turn-bitcoin-into-usd/ is a timely resource, providing clarity on cryptocurrency. Now, armed with practical insights, I'm better equipped to make informed financial decisions and explore profitable opportunities.

It’s great that you’re exploring ways to improve your system without breaking the bank! Tweaking your setup can often yield impressive results, even without expensive upgrades. Simple adjustments like optimizing speaker placement, using high-quality cables, or experimenting with acoustic treatments can make a big difference in sound and picture quality. Sometimes, small changes can be just as effective as shelling out for new equipment.
If you're looking to diversify into digital assets like HBAR (Hedera Hashgraph), which has great potential for use in various applications like decentralized finance, I recommend checking out Exolix. It’s an easy-to-use platform where you can exchange HBAR without needing to create an account, keeping the process simple and anonymous. It’s a great way to explore cryptocurrencies without the hassle.

Раньше я не задумывался о пользе лецитина, но после постоянной усталости и проблем с концентрацией решил попробовать. Выбрал соевый лецитин от Biotus и уже через пару недель заметил улучшения. Стало легче сосредотачиваться, исчезла постоянная утомляемость, улучшилось общее самочувствие.
Лецитин играет важную роль в работе мозга и нервной системы, поэтому особенно полезен тем, кто много работает интеллектуально. Также он поддерживает здоровье печени и улучшает метаболизм жиров, что делает его отличным дополнением к рациону.
При заказе на Biotus порадовала быстрая доставка и подробное описание продукта на сайте. Всё чётко, без лишних вопросов, а главное – качество на высоте. Дозировка удобная, принимать просто, и результат действительно ощущается.
Если хотите поддержать организм и улучшить когнитивные функции, рекомендую попробовать. Подробнее о свойствах и способе применения соевого лецитина узнайте на сайте Biotus. Берегите своё здоровье!


