Escape Road City embodies excitement, discovery, and a fair challenge rolled into one. Whether you’re evading the law or exploring hidden corners, the game rewards strategic thinking and skillful driving.
Spears and Munsil High-Definition Benchmark
 High Definition Benchmark
One of the questions I hear most from readers and enthusiasts alike is, “How can I make my video better?” Most of the time, they’re looking for advice on upgrading their Blu-ray player, DVD player, or display, but more often than not, you can make a lot of worthwhile improvements by simply tweaking your existing setup. You wouldn’t believe how often I visit someone’s home theater to find that their equipment is set up improperly, crippling their experience. A proper setup can often provide even more improvement than component upgrades.
Unfortunately, the tools you need to correctly set up your components have been pretty sparse. And now with Blu-ray in full swing, the selections are even smaller. In steps Spears and Munsil’s High Definition Benchmark Blu-ray Edition disc. This disc is available directly from www.spearsandmunsil.com for $25. It offers an incredible array of test patterns and instructions that help you dial in your display settings for a more accurate picture. It also lets you test the quality of your components’ HD video processing in a way that’s similar to how we test here at Home Theater.

• The main menu lets you access all of the video evaluation patterns.
Not Just Pretty Pictures
Stacey Spears and Don Munsil designed the High Definition Benchmark disc. Both work at Microsoft in various video groups, and both have been in the video business for quite some time. You may even remem-ber them as the founders of the “Progressive Scan Shootout” and “DVD Benchmark” over at Secrets of Home Theater and High Fidelity, the Website where I cut my teeth as a video reviewer. The test suite they developed there redefined the performance standards for progressive-scan DVD playback. High Definition Benchmark aims to do the same for Blu-ray players, A/V receivers, and high-definition displays, in addition to offering patterns for display setup.
The disc’s Demonstration Material section features a great montage of images from the beautiful Pacific Northwest. You’re treated to some beautiful coastal scenery from the Astoria, Oregon, area and some extensive coverage of the Seattle area as well. Spears shot all of the montage footage himself on the new RED ONE 4K HD camera. This makes this the only Blu-ray Disc I know that has test material captured native at 4K (downconverted, of course, to 1920 by 1080 for the Blu-ray transfer). This makes it a great piece for video demonstrations and showing off your home theater.
Unlike most Blu-rays out there, High Definition Benchmark offers direct access to the top menu, which lets you bypass the opening montage and production credits. If you want to fire up the disc just to do a touchup on your HDTV, you can get right to it. The main menu offers direct access to all of the video evaluation patterns. You can also navigate a top menu that provides video processing tests and access to the montage. Although the disc doesn’t provide audio test and setup signals, it includes the latest DTS-HD Master Audio and Dolby TrueHD trailers.
The Setup and Evaluation menu has an exten-sive list of patterns you can use to make the most of your display and player settings. Once you select a starting point, you can navigate from the directional menu navigation keys as opposed to the standard chapter skip buttons. So you never have to move your fingers away from the navigation buttons on your remote. You also don’t have to hit the Pause button to hold a pattern on the screen. You can press the right or left navigation keys to move to the last or next pattern or you can press the up button to access a help screen that shows information on the current pattern and how to use it. These onscreen guidelines typically provide a written description and graphics with examples of how to adjust the display with the pattern. When you press the down button, the help screen disappears. The navigation is intuitive, and the help screens make this a great tool for the pro as well as the novice who may not know where to start.
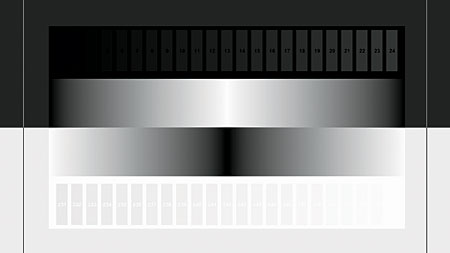
• Contrast Pattern
There are some other HD setup discs on the market (such as Digital Video Essentials: HD Basics), but most of them are geared toward aftermarket display calibration. While this disc does have some basic calibration patterns, its main focus is to help average consumers dial in their displays without any test equipment and help people under-stand why these changes are important and how to do them properly.
While you’ll see some familiar patterns like color bars on High Definition Benchmark, the disc also includes newly designed patterns that do a far better job with basic display adjustments and settings. This includes the always frustrating brightness and contrast settings, which establish proper black and white levels. Correctly setting these two parameters is paramount for the best performance from your display. Some brightness- and contrast-adjustment patterns leave too much room for error and interpretation, but that’s not the case here.
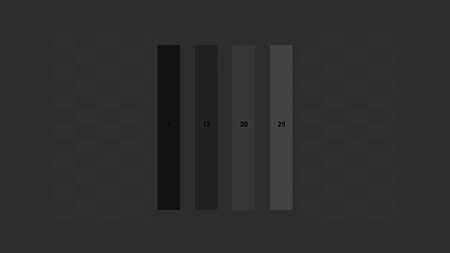
• PLUGE Low Pattern
The Brightness Control sets the level of black on your display, which we sometimes call the black floor. In addition to the standard black stripes, the PLUGE Low pattern also features a clever checkerboard design. In order to set brightness in the past, you often needed a disc player and display that could pass below-black information (encoded below the digital value 16, which is the correct black floor). If you have this below-black information, you can set your display’s brightness to the point where the below-black information in the pattern is invisible. This disc uses a different method that gives you a better reference for black. You don’t need a display or player that passes a below-black PLUGE to set it correctly. The checkerboard in the PLUGE Low pattern is encoded with squares at digital 16 and digital 17, which makes it a snap to get the proper setting. You simply lower the brightness until the brighter squares (digital 17) disappear, and then you raise it up until they become visible again. This should be within a click or two.
- Log in or register to post comments


Thanks for this very informative content.
Robert from Gouttieres Repentigny, A family business.


