DreamVision StarLight1 LCOS Projector Page 2
A Pixel Adjust feature moves the red, green, or blue components of the image horizontally or vertically by up to seven pixels each. The movements are limited to full pixel steps and can only help with errors of more than a half pixel. Our sample’s color alignment wasn’t perfect, but the deviations were less than a half pixel and not visible from a reasonable viewing distance.
The StarLight1 uses HQV video processing, and as you can see from the Video Test Bench chart, its processing is solid all around. You need to set the HDMI control to Enhanced to prevent clipping above white.
The onscreen graphic user interface is good, and you can set the controls to remain on until you manually close them (important while doing a calibration), or you can set them to time out. The layout and ergonomics of the fully backlit remote are also excellent.
Schneider-Free
You can use the StarLight1 without an anamorphic lens, and that’s how I began my viewing tests. I set the basic picture controls as accurately as possible but saved a full calibration for the anamorphic setup.
I used the DreamVision on the same 118-inch-wide, Stewart StudioTek 130 G3 projection screen (gain 1.3) that was in house for a report on the Digital Projection TITAN 3D projector (see page 24). I didn’t expect much punch from the StarLight1 on a screen this big, and I was ready to zoom down the image to achieve a reasonable brightness, if needed.
Was I ever surprised. Even on the full-screen width, the picture from the StarLight1 was gorgeous. In the Normal lamp mode (100 hours on the lamp) with the lens aperture fully open, it produced over 11.5 foot-lamberts. The High lamp mode increased this to over 16.5 ft-L. The black level was equally impressive in both lamp settings, at 0.001 ft-L.
The picture was outstanding in all respects. I preferred the High lamp setting. I like a bright image—as long as the black level is good. The picture practically jumped off the screen, with outstanding detail and good color. The projector clearly revealed scene-to-scene differences in the photographic quality of many films, but this was rarely distracting. Film grain was visible when it should be, and its absence was clearly evident on movies that were shot with video cameras—or created with a computer. Kung Fu Panda is one of the slickest, sharpest, and most colorful computer-generated films of this past decade, and the StarLight1 produced a level of big-screen eye candy that you don’t expect to see at this price. Baraka did the same for live action. While made-for-TV series are seldom as carefully photographed as a good theatrical production, seeing Lost from this projector on a 118-inch-wide screen was nevertheless a memorable experience.
Anamorphia
Next, I moved on to the task of fastening the optional Schneider Optics Cine-Digitar 1.33X anamorphic lens ($7,995) onto the StarLight1. The mounting bracket that comes with the lens kit looks simple enough, but the operation isn’t ideal for the allthumbed enthusiast. There are only a few adjustments, but the lens setup manual misstates at least one of them when it implies that the bracket can be moved from left to right; it can’t. It also fails to emphasize the correct orientation of the lens; the oval aperture visible when you look through it must be vertical.
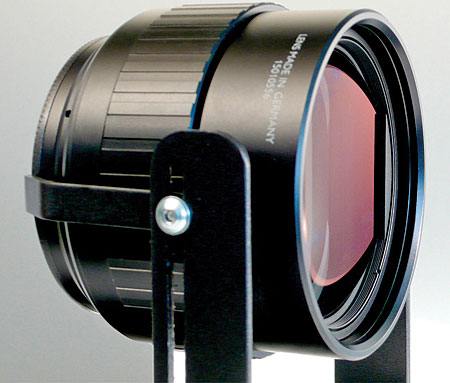
One of the three screws that secure the lens to the bracket would not tighten. A second screw required so much force that I was concerned I might have stripped the threads. Apparently I hadn’t, and the lens was ultimately secured with three of its four mounting screws. For all of these reasons, not to mention simply handling an $8,000 piece of glass and using a screwdriver within millimeters of the unprotected rear element, it was more than a little intimidating. This is something your DreamVision dealer or installer will handle for any potential buyers. A dealer with experience in anamorphic projection should also be better able to deal with other factors such as throw distance and projector-screen alignment, both of which can be more critical than in conventional setups.
When a 2.35:1 film is transferred to disc, many of the pixels are used up in the black bars. When you play back such source material in an anamorphic setup, the image is first stretched vertically so that it uses all of the pixels available on the imaging chips. In the StarLight models, the projector performs this vertical stretch electronically. The anamorphic lens then horizontally unsqueezes this vertically elongated image. Voilà. A 2.35:1 image that fills a 2.35:1 screen with no black bars.
But you don’t really need an anamorphic lens to use a 2.35:1 screen. You can simply adjust the lens’ zoom, focus, and perhaps vertical shift as needed to match the source. This is a little tedious, but it can work, particularly with a projector like the StarLight1. With all of its automated lens features, the changeover should take no more than five minutes. And the StarLight1’s blacks are so good that the black bars on a 2.35:1 transfer shouldn’t be distracting when they spill off above and below the active screen area—as they would be on a projector with a high black level.
- Log in or register to post comments

