Homespun DVDs Page 2
Project 1: Baseball Box Set
Many of the VHS tapes my Dad handed to me were of baseball games recorded in 1989 - that's when my then 15-year-old brother Kevin and his Syosset teammates in the Babe Ruth League nearly went all the way to the New York State pennant, but lost out to Staten Island in extra innings. I decided this would be a good opportunity to put Apple's iDVD program to the test. But first I needed to get all those tapes into my Mac - nearly 12 hours of footage. 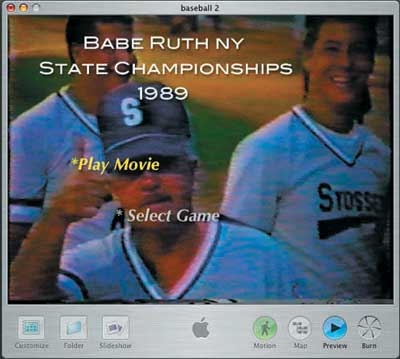
CAPTURING VHS If you're looking to transfer piles of old VHS videocassettes to DVD, the first thing you'll need is a device that converts analog audio and video into the digital MPEG or DV file formats that video-editing programs can understand. Several PC Cards that perform this chore and also provide the necessary A/V connections for your VCR or camcorder are available for less than $100. If your Mac or PC has a FireWire (IEEE 1394) or high-speed USB 2.0 port, you can get an external converter for around $150 to $250 from companies like Canopus , Pinnacle, and ADS Tech. These portable boxes tend to be more convenient than PC Cards since you don't have to reach around behind the computer to plug and unplug cables.
|
Digital video can quickly fill up your computer's built-in hard disk, so another recommended accessory for taking analog video into the digital domain is an external FireWire or USB 2.0 hard drive. The bigger the drive, the better - a 120-gigabyte (GB) LaCie D2 FireWire drive was barely large enough to hold 12 hours of footage from the six tapes I had on deck. Prices of external drives have recently fallen, so for less than $250 you can now get a 250-GB drive that holds around 24 hours of video.
With a VCR connected to my Canopus ADVC-100 converter and the converter hooked up to my Macintosh PowerBook G4, I was ready to transfer those tapes. After launching iMovie, I selected the program's Camera Capture mode. Cueing up a cassette, I hit play on the VCR's remote control and Import on the iMovie interface, and the old videos showed up in a window as they were digitized in real time.
CREATING THE DVD Apple's iMovie editing program does lots of neat tricks - among other things, it lets you add voiceover narration and background music from your iTunes library to your movies - but aside from recombining segments of baseball games that flowed onto two different tapes, all I needed to tap for this project were its two iDVD-related features. First, the Save Frame As menu option let me grab frames and save them as JPEG-format still images. Stills come in handy later on if you want to create a slideshow or a unique background for your DVD's menu. Second, the Chapter Markers feature let me select various points in the movie to drop in a chapter stop so viewers would be able to jump to specific scenes by hitting the chapter forward and reverse buttons on the player's remote.
Once I set my chapter markers, the next step was to launch iDVD by clicking on the Create iDVD Project button in iMovie. This not only opens the program, but it creates an opening menu screen for your new DVD - complete with title graphics, a button link that automatically plays the movie, and a secondary button that opens a submenu page with the first frame of each chapter you originally specified in iMovie shown as a thumbnail. From here, all that's left to do is customize the look of your disc. You can do this by selecting one of the more than 60 templates included in iDVD 4, some of which actually look pretty cool. Or if you're really ambitious, you can import your own background pictures and button elements.
To give my discs a baseball feel, I used several game stills that I'd saved in iMovie as background images for the menus. After putting in some fuzzy VHS frame grabs of baseball fields and players as my menu backgrounds, I selected the text-only option from the Settings submenu. This let me use just the words "Play Movie" and "Select Game" as my main-menu buttons on all discs.
FINISHING TOUCHES I decided to get more fancy with the submenus listing the individual games, which featured funky parallelogram-type buttons with movie clips playing inside. A neat thing about iDVD is that it lets you select durations of up to 14 1 / 2 seconds for these clips. Not only that, but you can scan through an entire movie to select the exact segment you want for a particular button.
With my DVD design mostly complete, I wanted to make sure the menus I had created made sense before I burned the project to disc. Clicking the Map button on the iDVD window produced a useful flowchart with a detailed overview of my project. Everything looked good, so I hit the Preview button and tested the links on my DVD's menus. Check. I was ready to burn.
But no DVD is truly complete without extras, so I scanned the movies I'd captured for some kind of supplement. At the end of the last tape I found a ceremony where coaches gave speeches and the players ambled onto the field to receive their trophies. Dropping an Easter Egg-type button on the final disc menu, I added this last movie as a Special Bonus DVD Extra. My mission was now complete: the 1989 New York State Babe Ruth League championship series had been saved from obscurity on VHS tapes. And now I also had something special to give my dad for Christmas.
- Log in or register to post comments
